Due 11:59 PM, Friday, April 4, 2014
This lab will guide you through writing a basic paravirtual hypervisor. We will use the bochs x86 emulator, which has support for Intel's VT-x hardware support. The main topics this lab will cover are: bootstrapping a guest OS, programming extended page tables, emulating privileged instructions, and using hypercalls to implement hard drive emulation over a disk image file.
The files you will need for this and subsequent lab assignments in this course are distributed using the Git version control system.
Git is a powerful, but tricky, version control system. We highly recommend taking time to understand git so that you will be comfortable using it during the labs. We recommend the following resources to learn more about git:
Each student (enrolled and on the waiting list) will be given a virtual machine on the OS teaching cluster with the basic required software installed. You will have root access to this machine, and be able to install additional tools (editors, debuggers, etc) as you see fit.
You are also welcome to install the needed software on your own laptop. The course staff is not available to help you debug your personal laptop configuration. The tools page has directions on how to set up bochs and gcc for use with JOS.
Each student currently enrolled or on the waiting list will be assigned a VM, IP, and an initial password. Newly enrolled students will be assigned a VM within a few days of enrolling.
To get started with your VM, you must do some system setup. You must initially setup your VM via the vSphere client; after setup is complete you can use ssh to access your VM.
Use a remote desktop client to connect to connect to ts1.cs.stonybrook.edu:22. Use CS\userid to log in, using the same username and password you use for department email.
Start the vSphere client. Select the vm server assigned to you, eg. esx1sc.cs.stonybrook.edu and again use your CS department credentials. Your VM assignment should indicate which esx server to log into. Ignore the SSL warning.
Once you have logged in, click on "Inventory", then select your VM from the list. Right click on it, and select "Open Console." Click the green "Play" button to start the VM. You can log in with the provided account and initial password. Immediately change your password!
After booting, the VM will be available via an ssh client on port 130 (use the -p option to specify a port, or add an entry to your .ssh/config file.).
Warning: It is highly advisable that you take a checkpoint of your VM at this point, especially if you intend to modify packages on the VM. This allows you to rollback the VM to a working state without CS department administrator help (which is not available on the weekends or late at night) if something goes horribly wrong. The button to take a checkpoint in vSphere is next to the button you used to power on the VM.
Good citizenship. You have administrator access to this VM and can install anything you like. That said, to keep load down, DO NOT INSTALL A GRAPHICAL DESKTOP on the VM. You may tunnel the X protocol (ssh -X) to your local machine and display your editor in a window.
You can install a simple X server without a complete desktop, which will allow you to forward the bochs console window back to your desktop.
sudo apt-get install xorg
sudo X
You may do the lab alone, or in a team of any size you like. If you work as a team, you will continue working together all semester.
Please email the instructor your group preference as soon as possible. Once we have your group membership, we will create a git repository, which you will use to hand in the assignment. If you choose to work alone, please email this to the instructor.
Once you have turned in your group selection, your group will be assigned a private git repository initially populated with the lab 1 JOS skeleton code. You will use this repository to turn in your code (see below). To download the files into your development environment, you need to clone the course repository, by running the commands below. Substitute your group id GROUP and your CS netid for USER below.
kermit% mkdir ~/cse591
kermit% cd ~/cse591
kermit% chmod 0700 . # (sets appropriate permissions)
kermit% git clone ssh://USER@scm.cs.stonybrook.edu:130/scm/cse591git-s14/hw-GROUP lab

Initialized empty Git repository in ......./cse591/lab/.git/
got f6ec6e08634de9b9c4d73ab5af92da16cc610f44
walk f6ec6e08634de9b9c4d73ab5af92da16cc610f44
got a8d9dd484df67d928a51127ce4c6d9f6d01c5a6a
...
got c9dab101498914dbdce377b89a6eb0f6a421d018
Checking out files: 100% (44/44), done.
kermit% cd lab
kermit%
Notice that each group will have their own git repository hosted on scm; your group ID should substituted in the URL above, and you will use your CS department account to log into scm. If you are in the course (not on the waitlist) and do not have a repository, please email the course staff with your group selection.
For students that do not have a private git repository yet, you may use the read-only git repository on the course webpage, using the alternate command below:
kermit% git clone http://www.cs.stonybrook.edu/~porter/courses/cse591/s14/jos.git lab
Git allows you to keep track of the changes you make to the code. For example, if you are finished with one of the exercises, and want to checkpoint your progress, you can commit your changes by running:
kermit% git commit -am 'my solution for lab1 exercise9'
Created commit 60d2135: my solution for lab1 exercise9
 1 files changed, 1 insertions(+), 0 deletions(-)
kermit%
You can keep track of your changes by using the git diff command. Running git diff will display the changes to your code since your last commit, and git diff origin/lab1 will display the changes relative to the initial code supplied for this lab. Here, origin/lab1 is the name of the git branch with the initial code you downloaded from our server for this assignment.
We have set up the appropriate compilers and simulators for you on the CS lab machines.
Labs will be handed in using the make handin command. This creates a tag in git and pushes the tag and changes to the source repository. You must commit all changes you want included in the handin.
When you are ready to hand in your lab, create a file slack.txt noting how many late hours you have used both for this assignment and in total. (This is to help us agree on the number that you have used.) This file should contain a single line formatted as follows (where n is the number of late hours):
late hours taken: nThen run make handin in the lab directory. If you submit multiple times, we will take the latest submission and count late hours accordingly.
In this and all other labs, you may complete challenge problems for extra credit. If you do this, please create a file called challenge.txt, which includes a short (e.g., one or two paragraph) description of what you did to solve your chosen challenge problem and how to test it. If you implement more than one challenge problem, you must describe each one.
If you submit multiple times, we will take the latest submission and count late hours accordingly.You do not need to turn in answers to any of the questions in the text of the lab. (Do answer them for yourself though! They will help with the rest of the lab.) Note, lab questions may reappear as exam questions!
We will be grading your solutions with a grading program. You can run make grade to test your solutions with the grading program.
If you initially cloned the read-only (http) repository, you must update your git configuration. First, do a git pull to pull any changes from the read-only source. Once you have a private repository for handing in the labs, you should issue this command to add the handin repository (substituting your user and group IDs appropriately):
git remote add handin ssh://USER@scm.cs.stonybrook.edu:130/scm/cse591git-s14/GROUPYou can double check the .git/config file to verify the update was successul. Initially, the config will look something like this:
[core]
	repositoryformatversion = 0
	filemode = true
	bare = false
	logallrefupdates = true
[remote "origin"]
	fetch = +refs/heads/*:refs/remotes/origin/*
	url = http://www.cs.stonybrook.edu/~porter/courses/cse591/s14/jos.git
[branch "lab1"]
	remote = origin
	merge = refs/heads/lab1
There should now be a new remote entry like this:
[core]
	repositoryformatversion = 0
	filemode = true
	bare = false
	logallrefupdates = true
[remote "origin"]
	fetch = +refs/heads/*:refs/remotes/origin/*
	url = http://www.cs.stonybrook.edu/~porter/courses/cse591/s14/jos.git
[branch "lab1"]
	remote = origin
	merge = refs/heads/lab1
[remote "handin"]
	fetch = +refs/heads/*:refs/remotes/handin/*
	url = ssh://USER@scm.cs.stonybrook.edu:130/scm/cse591git-s14/hw-GROUP
To start JOS inside bochs, simply type:
make bochs
When you check out the lab code, all of the JOS exercises are not implemented. Rather than spending the semester working the assignments that would be given in CSE 506, you may either use a solution from a previous 506 course, or a solution that is online, such as the ones here or here. In general, this would be expressly forbidden by the collaboration policy, but we will make an exception for exercise 0 only!. You may also work with any other students in the class to port one of these solutions to the base code.
Important note: The baseline code is for 64-bit x86 with some Stony Brook-specific changes to memory layout, whereas the solutions online are for the standard 32-bit MIT version of the code. So you will need to adapt an online solution to this codebase. We will post hints here as issues arise, so be sure to check back.
Exercise 0. Get the baseline JOS system working. You can refer to the instruction from the last 506 course for more details. You may skip lab 6, the network driver, but you will need a working file system and shell.
You can verify that your code works by running each of the grading scripts, such as./grade-lab1
The JOS VMM is launched by a fairly simple program in user/vmm.c. This application calls a new system call to create an environment (similar to a process) that runs in guest mode instead of ring 3 (sys_env_mkguest).
Once the guest is created, the VMM then copies the bootloader and kernel into the guest's physical address space, marks the environment as runnable, and waits until the guest exits.
You will need to implement key pieces of the supporting system calls for the VMM, as well as some of the copying functionality.
You can try running the vmm from the shell in your guest by typing:
$ vmm
This will currently panic the kernel because the code to detect vmx and extended page table support is not implemented, but as you complete the lab, you will see this launch a JOS-in-JOS environment.
The JOS bookkeeping for sys_env_mkguest is already provided for you in kern/syscall.c. Especially if you did not work the JOS labs, you may wish to skim this code, as well as the code in kern/env.c to understand how environments are managed. A major difference between a guest and a regular environment is that a guest has its type set to ENV_TYPE_GUEST as well as a VmxGuestInfo structureand a vmcs structure associated with it.
The vmm directory includes the kernel-level support needed for the VMM---primarily extended page table support.
Your first task will be to implement detection that the CPU supports vmx and extended paging. do this by checking the output of the cpuid instruction and reading the values in certain model specific registers (MSRs).
Exercise 1. Read Chapters 23.6, 24.6.2, and Appendices A.3.2-3 from the Intel manual to learn how to discover if the CPU supports vmx and extended paging.
Once you have read these sections, implement the vmx_check_support() and vmx_check_ept() functions in vmm/vmx.c. You will also need to add support to sched_yield() to call vmxon() when launcing a guest environment.
If these functions are properly implemented, an attempt to start the VMM will not panic the kernel, but will fail because the vmm can't map guest bootloader and kernel into the VM.
In user/vmm.c we have provided the structure of the code to set up the guest and bootloader. However, you must implement the memory manipulation code to copy the guest kernel and bootloader into the VM.
Like any other user application in JOS, the vmm has the ability to open files, read pages, and map pages into other environments via IPC. One difference is that we've added a new system call sys_ept_map, which you must implement. The high-level difference between sys_ept_map and sys_page_map is whether the page is added using extended page tables or regular page tables.
Exercise 2. Skim Chapter 28.2 of the Intel manual to familiarize yourself with low-level EPT programming. Several helpful definitions have been provided in vmm/ept.h.
Implement sys_ept_map in kern/syscall.c, as well as ept_lookup_gpa and ept_map_hva2gpa in vmm/ept.c. Once this is complete, you should have complete support for nested paging.
Note: you will need to write your own test cases for these functions to verify that they work properly.
At this point, you have enough host-level support function to map the guest bootloader and kernel into the guest VM. You will need to read the kernel's ELF headers and copy the segments into the guest.
Exercise 3. Implement copy_guest_kern_gpa() and map_in_guest() in user/vmm.c. For the bootloader, we use map_in_guest directly, since the bootloader is only 512 bytes, whereas the kernel's ELF header must be read by copy_guest_kern_gpa, which should then call map_in_guest for each segment.
Once this is complete, the kernel will attempt to run the guest, and will panic because asm_vmrun is incomplete.
Challenge (20 bonus points, or part of the final project) One way this VMM paravirtualizes JOS is to map the kernel into the guest and use a simpler, modified bootloader. Replace our modified bootloader in vmm/jos_boot.S with the unmodified bootloader in boot/boot.S, and eliminate the need to map the kernel for the guest in the VMM.
This will require trapping accesses to the I/O ports to detect disk reads, and possibly trapping other operations.
In this exercise, you will need to write some assembly to launch the VM. Although much of the VMCS setup is completed for you, this exercise will require you to use the vmwrite instruction to set the host stack pointer, as well as the vmlaunch and vmresume instructions to start the VM.
In order to facilitate interaction between the guest and the JOS host kernel, we copy the guest register state into the environment's Trapframe structure. Thus, you will also write assembly to copy the relevant guest registers to and from this trapframe struct.
Exercise 4. Skim Chapter 26 of the Intel manual to familiarize yourself with the vmlaunch and vmresume instructions. Complete the assembly code in asm_vmrun in vmm/vmx.c.
Once this is complete, you should be able to run the VM until the guest attempts a vmcall instruction, which traps to the host kernel. Because the host isn't handling traps from the guest yet, the VM will be terminated.
The equivalent event to a trap from an application to the operating system is called a VM exit. We have provided some skeleton code to dispatch the major types of exits we expect our guest to provide in the vmm/vmx.c function vmexit(). You will need to identify the reason for the exit from the VMCS, as well as implement handler functions for certain events in vmm/vmexits.c.
Similar to issuing a system call (e.g., using the int or syscall instruction), a guest can programmatically trap to the host using the vmcall instruction (sometimes called hypercalls). The current JOS guest uses three hypercalls: one to read the e820 map, which specifies the physical memory layout to the OS; and two to use host-level IPC, discussed below.
JOS is "told" the amount of physical memory it has by the bootloader. JOS's bootloader passes the kernel a multiboot info structure which possibly contains the physical memory map of the system. The memory map may exclude regions of memory that are in use for reasons including IO mappings for devices (e.g., the "memory hole"), space reserved for the BIOS, or physically damaged memory. For more details on how this structure looks and what it contains, refer to the specification. A typical physical memory map for a PC with 10 GB of memory looks like below.
        e820 MEMORY MAP
            address: 0x0000000000000000, length: 0x000000000009f400, type: USABLE
            address: 0x000000000009f400, length: 0x0000000000000c00, type: RESERVED
            address: 0x00000000000f0000, length: 0x0000000000010000, type: RESERVED
            address: 0x0000000000100000, length: 0x00000000dfefd000, type: USABLE
            address: 0x00000000dfffd000, length: 0x0000000000003000, type: RESERVED
            address: 0x00000000fffc0000, length: 0x0000000000040000, type: RESERVED
            address: 0x0000000100000000, length: 0x00000001a0000000, type: USABLE
For the JOS guest, rather than emulate a BIOS, we will simply use a vmcall to request a "fake" memory map. Complete emulation of this feature would be an excellent bonus task, or part of a final project.
Exercise 5. Complete the implementation of vmexit() by identifying the reason for the exit from the VMCS. You may need to search Chapter 27 of the Intel manual to solve this part of the exercise.
Implement the VMX_VMCALL_MBMAP case of the function handle_vmcall() in vmm/vmexits.c. Also, be sure to advance the instruction pointer so that the guest doesn't get in an infinite loop.
Once the guest gets a little further in boot, it will attempt to discover whether the CPU supports long mode, using the cpuid instruction. Our VMCS is configured to trap on this instruction, so that we can emulate it---hiding the presence of vmx, since we have not implemented emulation of vmx in software.
Exercise 6. Once this is complete, implement handle_cpuid() in vmm/vmexits.c.
When the host can emulate the cpuid instruction, your guest should run until it attempts to perform disk I/O.
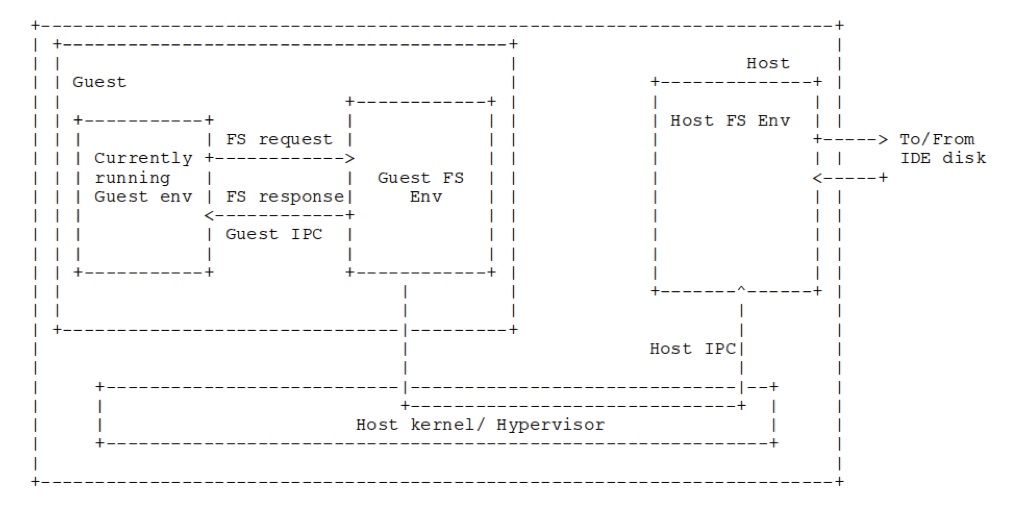
Recall that JOS has a user-level file system server daemon, similar to a microkernel. We place the guest's disk image as a file on the host file system server. When the guest file system daemon requests disk reads, rather than issuing ide-level commands, we will instead use vmcalls to ask the host file system daemon for regions of the disk image file. This is depicted in the image below.
Exercise 7. Modify bc_pgfault amd flush_block in fs/bc.c to issue I/O requests using the host_read and host_write hypercalls. Use the macro VMM_GUEST to select different behavior for the guest and host OS.
Once this is complete, you will need to implement the IPC send and receive hypercalls in handle_vmcall, as well as the client code to issue ipc_host_send and ipc_host_recv vmcalls in lib/ipc.c>.
Finally, you will need to extend the sys_ipc_try_send and sys_ipc_recv calls to detect whether the environment is of type ENV_TYPE_GUEST or not, and replace the pmap functions with ept calls. You will also need to implement the ept_page_insert function.
Once these steps are complete, you should have a fully running JOS-on-JOS.
This completes the lab. Type make handin in the lab directory. This will only work after submitting your partner selection to the instructor. After successful submission, you should receive a confirmation email (although you may need to try twice to get the email). If submission fails, double check that you have committed all of your changes, and read any error messages carefully before emailing the TAs for help.
Last updated: 2014-03-30 09:33:32 -0400 [validate xhtml]